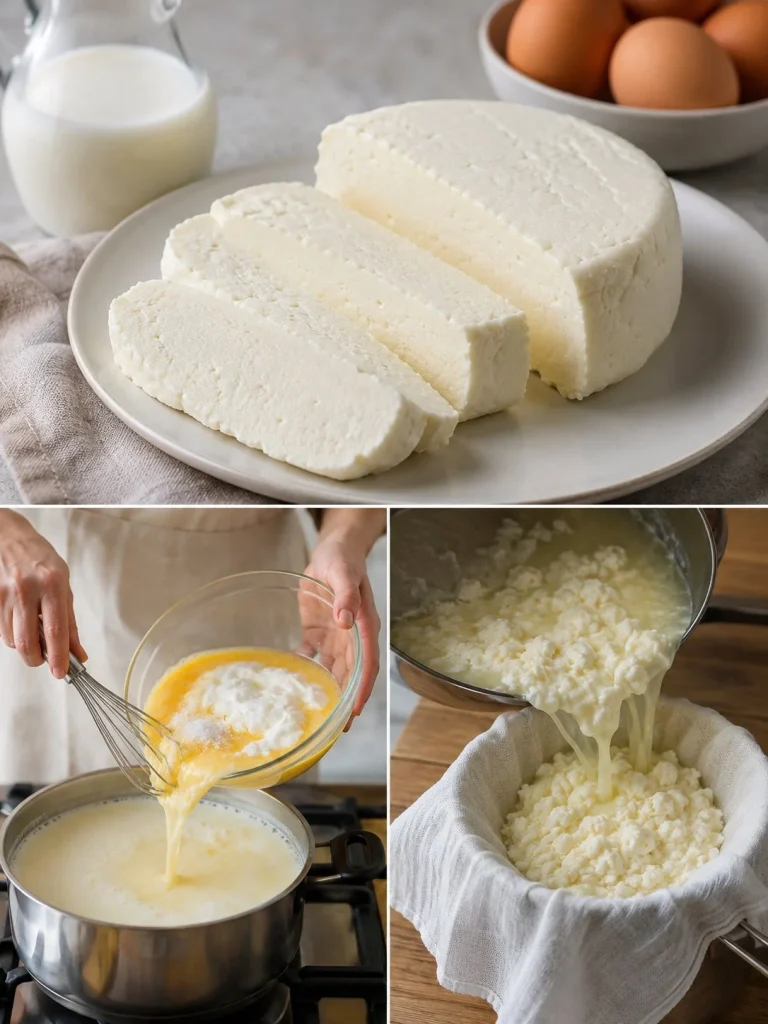
Using just a few simple ingredients, this recipe transforms everyday milk and eggs into a fresh, homemade cheese that’s surprisingly easy to make. It’s a great alternative if you want to avoid store-bought cheese or prefer a simple dairy product without additives. Rich in protein, this cheese feels filling and wholesome, while the added yogurt or sour cream introduces a subtle tang and creaminess. Just keep in mind that because it relies heavily on dairy and eggs, it might not suit everyone’s dietary preferences or needs, especially those who are lactose intolerant or allergic to eggs.
This homemade cheese is perfect for anyone who enjoys cooking at home with straightforward ingredients and wants a fresh, natural cheese for sandwiches, salads, or snacking. You’ll appreciate how the curdling process creates a firm yet tender cheese texture that holds well when sliced. A practical kitchen tip: stir continuously when adding the egg mixture to the milk to avoid lumps and encourage smooth curdling.
Why This Recipe Is Helpful
- Requires only 4 common ingredients, making it budget-friendly and easy to prepare.
- Results in fresh cheese without preservatives or emulsifiers found in many store-bought options.
- The firm texture works well in sandwiches, salads, and simple snacks.
- High in protein, which adds satiation and can support balanced meals.
- Uses a gentle cooking process, avoiding high heat that might scorch milk.
- The method encourages minimal waste and can easily be adapted or scaled up.
Who This Recipe Is Best For
This recipe suits those who enjoy natural, homemade dairy products and want a simple, fresh cheese to add to their cooking. It’s ideal for home cooks looking for an uncomplicated process with minimal equipment. Families appreciating wholesome protein-rich snacks and sandwiches will find this especially useful, as well as those wishing to avoid the processed preservatives in commercial cheese. It also offers a chance to experiment with dairy basics and build confidence in kitchen skills.
Who Should Be Careful
People with dairy or egg allergies should avoid this recipe. Similarly, those who are lactose intolerant might find this fresh cheese less tolerable than aged cheeses, as it contains lactose from the milk. Because it’s fairly rich due to the milk and eggs, it’s best enjoyed in moderation as part of a balanced diet, especially for those monitoring fat intake or cholesterol.
Ingredients
- 2 liters (8 1/2 cups) whole milk
- 3 large eggs
- 1/2 teaspoon salt
- 3 tablespoons (45 ml) plain yogurt or sour cream
Ingredient Notes
Using whole milk gives this cheese a fuller texture and richer taste; however, you can experiment with reduced-fat milk for a lighter version. The eggs act as a natural curdling agent along with yogurt or sour cream, which adds acidity and creaminess. Salt enhances flavor and balances the slight tang of the fermented dairy. Using plain yogurt rather than flavored versions keeps the cheese versatile in taste.
Kitchen Tools Needed
- Medium mixing bowl
- Whisk or fork
- Large heavy-bottomed pot
- Wooden spoon or heatproof spatula
- Fine mesh sieve or cheesecloth-lined colander
- A bowl to collect whey
- A weight (such as a clean, heavy plate) for pressing
Step-by-Step Instructions
- In a medium bowl, whisk the 3 eggs with 1/2 teaspoon salt until thoroughly combined.
- Mix in 3 tablespoons of plain yogurt or sour cream to the egg mixture until smooth and well blended.
- Pour the 2 liters (8 1/2 cups) of whole milk into a large pot and heat it on medium until it is just below boiling — you should see steam and small bubbles forming around the edges, but it should not fully boil.
- Slowly pour the egg and yogurt mixture into the hot milk while stirring continuously with a wooden spoon or spatula. This steady stirring is crucial to prevent lumps and help the milk curdle evenly.
- Keep cooking and stirring gently for 5 to 7 minutes until you see clear separation of curds (solid) and whey (liquid). The curds will look like soft clumps floating in the translucent whey.
- Place a fine mesh sieve or a colander lined with cheesecloth over a large bowl. Carefully pour the curdled mixture into the sieve to strain off the whey.
- Press down on the curds with a weighted plate or other heavy object to remove excess moisture more quickly. Refrigerate the weighted curds in the sieve for 3 to 4 hours.
- Once set, you’ll have a firm, fresh cheese ready to slice and enjoy on sandwiches, crackers, or salads.
Pro Tips
- Stir continuously but gently when adding the egg mixture to avoid scrambling the eggs.
- Use a heavy-bottomed pot to prevent milk from scorching during heating.
- If you want a creamier texture, try using Greek yogurt instead of plain yogurt.
- To get a fluffier, milder cheese, you can reduce the salt slightly or replace with flavored herbs after pressing.
- Refrigerate the cheese well wrapped to preserve freshness and prevent drying out.
Healthier or Lighter Swaps
Switching to low-fat or 2% milk will reduce calories and fat while keeping the protein intact. Using Greek yogurt adds more protein and creaminess without extra sugar. If you’re seeking to limit salt, reduce it slightly but keep some to enhance flavor. This cheese is naturally rich, so serving smaller portions alongside vegetables or whole grain bread balances the meal well.
Common Mistakes
- Pouring the egg mixture too quickly or without stirring can cause lumps or curdling unevenly.
- Boiling the milk can cause a burnt flavor or interfere with curd formation — aim for just under boiling.
- Not pressing the cheese enough will result in a wetter, less firm texture.
- Skipping the refrigeration step can cause a soft cheese that won’t slice nicely.
- Using flavored or sweetened yogurt will alter the final taste unexpectedly.
Variations
- Add fresh herbs like chives, dill, or basil for a flavorful twist after pressing.
- Substitute sour cream with crème fraîche for a richer taste.
- Mix in finely chopped nuts or seeds into the curds before pressing for texture.
- For a spiced version, add black pepper or smoked paprika during the egg mixture stage.
Serving Suggestions
Serve this fresh cheese sliced on a sandwich with fresh tomatoes and leafy greens. It also works wonderfully crumbled over salads or spread on toasted artisan bread with a drizzle of olive oil. Pairing with fresh vegetables or fruit balances the richness of the cheese nicely. It’s a versatile dairy option for breakfast, lunch, or snack time.
Storage Instructions
Store the homemade cheese wrapped tightly in parchment paper or plastic wrap inside an airtight container. Keep refrigerated and consume within 3 to 4 days for best flavor and texture. The cheese may dry out if left uncovered.
Reheating Tips
This cheese is best enjoyed cold or at room temperature. Heating isn’t recommended as it can cause the cheese to separate or become rubbery. Instead, use it fresh for sandwiches or salads.
Nutrition Estimate
Per serving (assuming 8 servings):
Calories: ~150 kcal
Protein: ~10 g
Carbohydrates: ~6 g
Fat: ~8 g
Values are approximate and depend on the milk and yogurt used.
Recipe Summary
- Prep Time: 10 minutes
- Cook Time: 7 minutes
- Refrigeration Time: 3-4 hours
- Total Time: About 4 hours 20 minutes
- Servings: 8
- Cuisine: Homemade dairy
- Course: Snack, Side
- Calories: Approx. 150 kcal per serving
Frequently Asked Questions
Is this recipe good for digestion?
It contains dairy and eggs but no added fiber. People sensitive to lactose might experience discomfort, so it’s best for those accustomed to milk products.
Is this recipe suitable for people managing blood sugar?
It’s relatively low in carbohydrates, but because it’s rich and creamy, portion control is advised, especially for those monitoring fat intake.
Can I make this recipe lighter?
Using low-fat milk and Greek yogurt can reduce calories without sacrificing much creaminess.
Is this recipe good for kids?
Yes, kids often enjoy mild fresh cheese, and it packs protein. Just check for dairy or egg allergies first.
Can this cheese be meal-prepped?
Definitely. It stores well refrigerated and can be prepared ahead, making it convenient for quick meals and snacks.
This homemade cheese recipe is a satisfying and simple way to enjoy fresh, natural dairy without additives. It’s a rewarding kitchen project that offers versatility for everyday meals and snacks. One small practical note: maintaining gentle heat and constant stirring ensures smooth curds every time, so don’t rush that step for best results.
For those interested in simple kitchen remedies and homemade traditions, this recipe fits nicely alongside other natural, easy-to-make treats, much like those shared in other practical DIY recipes.